Category Archives: Holidays

Naptime Craft: Pennant Cupcake Toppers

People, these are adorable. Adorable, and can be completed in one naptime, even if your little monkeys think “nap” means “twenty minute power charge” (AHEM, Baby Jake. Now give your mama a break!).

Here’s what I used:

  • Double-stick tape
  • Craft knife and scissors (or just scissors is fine, too)
  • Pretty paper: I used scrapbook paper I had left over from other things, but you could use wrapping paper, wall paper, construction paper… Endless options!
  • Toothpicks

Here’s what I did:

NOTE: Obviously, this isn’t the only way to do these, but it was definitely faster than other ways I’ve tried! And around here, faster is good!

  1. Cut long strips of paper a little wider than your tape.
  2. Cut a loooooong piece of tape: you want it to go the whole length of your little paper strip. Now stick that tape to your paper.
  3. Cut the long strip into shorter sections. (Mine were about 3 inches long; I eyeballed it.)
  4. Fold them in half with the toothpick in the middle. (Don’t fold them in half and then try to put the toothpick in afterwards!)
  5. Cut a little triangle out of the end of your little flag, if you like.
  6. All done! So cute! Throw a party!


Leave a comment

Filed under Food, Holidays, Just for Fun, Naptime Craft, Projects and Crafty Things, The Boys

Happy Valentine’s Day!

Happy Valentine’s Day from all of us here at Ink & Squid! I hope you know how much you are loved today.

All images copyright 2012 by Ink & Squid. All rights reserved.

Leave a comment

Filed under Holidays, Just for Fun, Life, The Boys

Day 25: Because We All Need Reminding.

Luke 2:4-14

4 So Joseph also went up from the town of Nazareth in Galilee to Judea, to Bethlehem the town of David, because he belonged to the house and line of David. 5 He went there to register with Mary, who was pledged to be married to him and was expecting a child. 6 While they were there, the time came for the baby to be born, 7and she gave birth to her firstborn, a son. She wrapped him in cloths and placed him in a manger, because there was no guest room available for them.

8 And there were shepherds living out in the fields nearby, keeping watch over their flocks at night. 9 An angel of the Lord appeared to them, and the glory of the Lord shone around them, and they were terrified. 10 But the angel said to them, “Do not be afraid. I bring you good news that will cause great joy for all the people. 11 Today in the town of David a Savior has been born to you; he is the Messiah, the Lord. 12 This will be a sign to you: You will find a baby wrapped in cloths and lying in a manger.”

13 Suddenly a great company of the heavenly host appeared with the angel, praising God and saying,


Image copyright 2011 by Bonnie Van Voorst for Ink & Squid


Leave a comment

Filed under 25 Days of Christmas, Holidays

Wrap it Pretty: What to Do About Those Gift Cards!

Let’s talk gift cards.

I think gift cards are brilliant. I love them. I love getting them.

I do not, however, love giving them. I know that sometimes, they really are the perfect thing, but I always feel like a little bit of a jerk: like I didn’t really give a whole gift. And I hate the idea of the recipient feeling like I gave a gift card as an afterthought (although I’ve never felt like that when given a gift card!), so I like to think of ways to make a gift card feel more thought-through and personal.

One way to do that is to wrap it up beautifully. I know it’s easier to grab one of those lame little tins in the checkout line- or worse, just shove it into the envelope they give you and scrawl a name on the front. (No offense. But UGH.) A beautifully-wrapped package- even if it’s just socks inside!- always feels more important. So here are a few easy bits of inspiration that you can quickly DIY to make your gift cards (or whatever it is you’re giving) look like a million bucks!

P.s. Did I mention that they’re all F R E E (or nearly so)?

  1. Hand-drawn gift wrap from MiniEco: silver Sharpie on kraft paper.
  2. Handmade Holiday- Woodland Wrapping from Odessa May Society: white pen or marker on brown kraft or butcher paper.
  3. Holiday wrapping with paper bags from Alisa Burke: white-out pen and Sharpie marker on brown paper grocery bags!
  4. Fabric poppy flower gift toppers from Creature Comforts: red polyester fabric and black embroidery floss.
  5. Magazine-page gift bow from How About Orange: reuse your pretty magazine and catalog pages!
  6. Paper bow freebie and how-to from Ellinee: print out her template, cut it out, tape it together, and make things prettier.
  7. Sheet music gift wrap from French Larkspur: use old sheet music (or print some off) as beautiful wrapping paper.
  8. Waxed paper pom pom flowers from Nice Package: all you need is waxed paper and a little wire! They’re gorgeous.
  9. Yarn pom-pom gift topper from Creature Comforts: you know I love my pom poms! So simple and fun.

Leave a comment

Filed under 25 Days of Christmas, Design & Decor, Holidays, Projects and Crafty Things

Make-It Decoration: Toilet Paper Tube Wreath

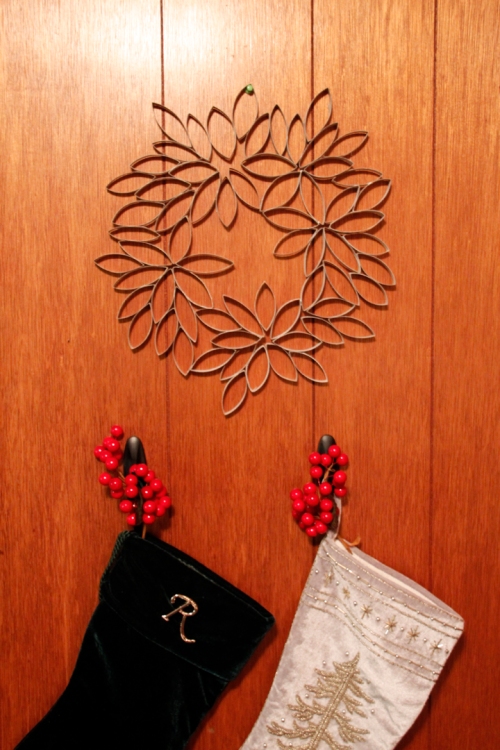
This wreath, made from empty toilet paper and paper towel tubes, not only ends up looking classy and fun, it’s very nearly FREE. Who doesn’t like FREE? It’s also quick- all the steps up to letting it dry and spray-painting it took me just thirty minutes! Not bad for something so cute!  Who would guess it’s made of glue and toilet paper tubes? (While you’re at it, why not make some little ones as well to use as gift toppers?)

Here’s what you need:

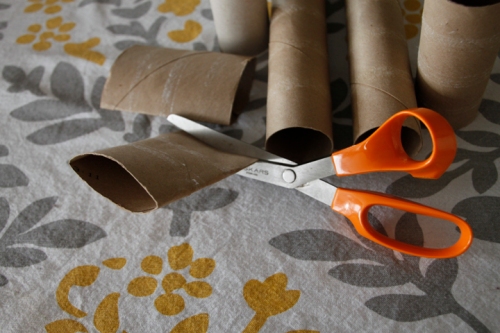
  • Empty toilet paper and paper towel rolls: I used 2 paper towel rolls and 4 toilet paper rolls, and had lots of pieces left over.
  • Scissors
  • Glue (See below for a brief discussion on glue. I know, fascinating, right?)
  • Spray paint

Here’s what I did:

  1. Flatten your paper rolls.
  2. Cut them into strips about a centimeter wide. Don’t worry about measuring or making perfect cuts; this project is very forgiving!
  3. Arrange into a ring as large as you want your wreath. (Hint: put a bowl into the middle to help you create a circle, then pull the bowl out and fill in the middle of your wreath a little more.)
  4. Glue all your pieces together, then let your glue dry.
  5. Spray paint, then let dry again. You may need a couple (thin!) coats for full coverage.
  6. Hang it up! (You can tie a piece of string through one of the pieces to hang it, or simply put one of the pieces over a nail.)

_______________________________________________________

About Glue:

There are a few different adhesives you can use to put this together, and each has its own  pros and cons.

I used: Aleene’s Tacky Glue. Pros: no odor, inexpensive, dries clear. Cons: takes a while to dry, can be a little messy.

Other options:

  • A glue gun. Pros: dries quickly, no odor. Cons: not good for little helpers, your project can end up covered with glue-gun-strings.
  • Double-sided tape or glue dots. Pros: no dry time, no odor. Cons: expensive, difficult to reposition if you make a mistake.

Of course, if you have a preferred sticky substance that you would rather use, go for it!

1 Comment

Filed under 25 Days of Christmas, Design & Decor, Holidays

Make-It Gift: Sweet Yo-Yo Headband

Yes, I know that it’s been a couple (coughfive) days since Day 21. I have 7 month old twins and it’s almost Christmas. So sue me.

Back to business, though, I still have four days of posts left for you! And don’t worry, these are all things that you can whip up in the nick of time for Christmas… or save for next year, if your brain is already too fried.

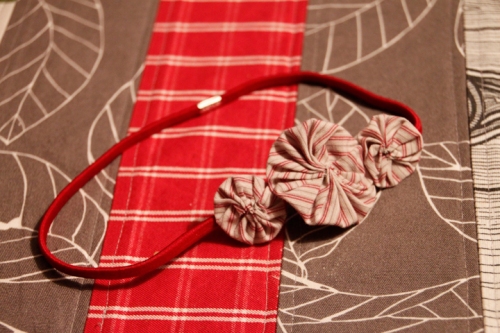
Today, it’s a yo-yo headband, so sweet for a little girl, or fun and a little funky for an adult. And seriously easy. I finished mine in less than an episode of Diners, Drive-Ins, and Dives, and part of that time was spent undoing knots in my thread. (I have a huge problem with thread knots.)

Here’s what you need:

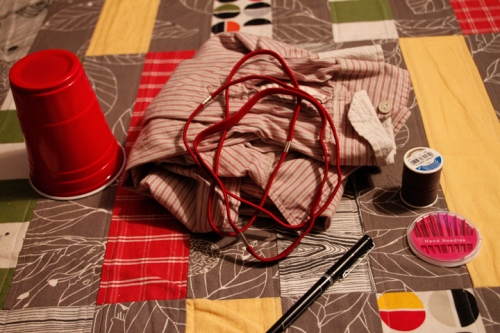
  • Fabric: I used a little section of one of my husband’s old cotton button-downs, that had been retired due to an unfortunate turmeric incident (but some really fabulous lemon-turmeric rice!). You only need a piece maybe 6 or 8 inches square, so round up your scraps!
  • A headband: mine are Goody brand elastic headbands, from a multi-pack.
  • Scissors
  • A needle and thread
  • A template for your yo-yos: I use a red plastic cup. It’s sturdy and gives me a medium and small template with no work on my part.

Here’s what I did:

  1. Trace out one medium and two small circles onto your fabric using your template(s), then cut them out.
  2. Make your yo-yos; Tea Rose Home has a great tutorial with lots of pictures, and is explained much more clearly than mine would be.
  3. Sew your yo-yos to each other (make a couple tiny stitches right at the edge- it doesn’t have to be much, just enough to hold), then sew them to the headband.

That’s all! I want to make a few more, using up some of my funky vintage fabric scraps, since I do have the rest of a multi-pack of headbands…

Happy crafting, and happy giving!

Leave a comment

Filed under 25 Days of Christmas, Holidays, Projects and Crafty Things

Free Printable: Bookplates

Don’t worry, I didn’t forget about today! It’s the 21st Day of Christmas, and I have a special printable for you. Print them out and use them for yourself… or give them as a gift, along with a favorite book. They work equally well printed on regular paper and glued in (with an acid-free glue stick) or printed onto label paper (the full sheet kind). And as always, please take a peek below and check out the fine print before you go a-printing.

To print:

Click on the image of the letter. It should open in a window by itself. You may need to click it again to make it full-sized (it’ll probably be larger than your screen) and save it. Then print, print, print away!

The fine print:

This printable is free for your personal use and enjoyment, and is not to be altered, sold, or used for profit.


Leave a comment

Filed under 25 Days of Christmas, Holidays, Projects and Crafty Things

Gifting Guide: The Sophisticate

Gentleman or lady, there’s probably at least one sophisticated someone in your life that needs a gift that’s just right. Take a look below, and maybe you’ll find the perfect thing!

_________________________________________________________

BUY


Going Hunting Red and Camel jersey hand printed circle scarf, Bark Decor, $41

Mint leaf necklace, sammi84, $43

“Reticulate” stainless steel leaf earrings, Nervous System, $40

Set of 3 Modern White Small Bottle Vases, Sara Paloma, $140

Looking Glass Decanter, Anthropologie, $58

Lollia In Love Bubble Bath, Anthropologie, $34

Mini Espresso Maker, Restoration Hardware, $27

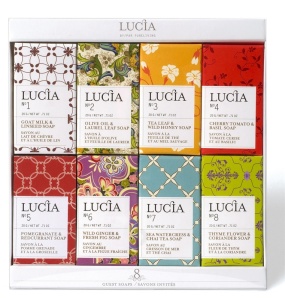
Lucia Box of Assorted Guest Soaps, Burke Decor, $18

_________________________________________________________

MAKE


Floral Pillows with Ultrasuede Petals, Martha Stewart

Father’s Day Tie, The Purl Bee

Ear Warmers, Delia Creates

Map Coasters, Martha Stewart

Tub Teas, Martha Stewart

Renske’s Minimalist Tote Bag, Design*Sponge

Leather Envelope Phone Case, Design*Sponge

Leave a comment

Filed under 25 Days of Christmas, Holidays

Kid-Friendly Christmas Craft: Pom Pom Garland

Yep, it’s pom poms again! They’re cute and easy and fast, and boy, do they make a fun garland! Kids can easily make this themselves if they’re old enough to (safely) use scissors, or they can do everything but the cutting if they’re a little younger. You don’t even need a pom pom maker for these: I just use my two fingers!

Here’s what you’ll need:

Here’s what I did:

1.  Make your pom poms: I made mine by wrapping my yarn about 40 times around my index and middle fingers*, then carefully pulling the wrapped yarn off and tying around the middle of the bundle. Then cut all of the loops open and trim the pom pom down evenly. I made a total of 19 pom poms for about 7 feet of garland (plus extra on the ends for hanging).


2.  String your pom poms: Thread your needle with a long piece of yarn; mine was 9 feet, so I had extra to hang my garland. Run the needle through the center of each pom pom, pulling it down the yarn towards the center. Note: It’s a lot easier to make the garland working on one side at a time, working out from the center; that way you aren’t having to pull the pom poms as far down the yarn. Space the pom poms evenly as you go, about 3 inches apart.

3.  Hang your garland using the extra yarn on the ends.

*These pom poms are about 1 1/2 inches in diameter once they’re trimmed. If you want bigger pom poms, wrap the yarn more times around more fingers.

1 Comment

Filed under 25 Days of Christmas, Design & Decor, Holidays, Projects and Crafty Things

The 25 Days of Christmas: A Recap

Go ahead, pick a day! Clicking any of the days below will take you to that day’s post. Why not check out all of them?


Leave a comment

Filed under 25 Days of Christmas, Holidays, Projects and Crafty Things